Showing posts with label Did you know. Show all posts

Thursday, December 20, 2007

Show Desktop missing?

Show Desktop
After opening hundreds of windows and you want to desperately do something with your desktop, you have to go on minimizing all the windows. This is where the Show Desktop is used. For those who have not seen it, it is there in the quick launch section of the Task Bar.


And for the more unlucky guys who have not enabled the quick launch, a google search would be more than enough to know more.

And for the lucky guys like me, who occassionally find it interesting to accidently delete files ;), here is the Show Desktop file
Filename : Show Desktop.scf
Contents ...

[Shell]
Command=2
IconFile=explorer.exe,3
[Taskbar]
Command=ToggleDesktop

Monday, September 17, 2007

Introduction to Windows - Programming for Windows

History - DOS
Disk Operating System aka DOS was one of the earlier operating systems, it was a single task system, where the whole system and the OS was devoted to executing a single program and was basically a text based OS.

With the advent of the Windows Operating System, multiple process or applications could be run and it became a graphical OS (interface). So in order to support new features the basic structure of C/C++ programs changed from the main(){...} procedure to
something of a program as shown below and the a new compiler is required for compiling and generating Windows Executables, Visual C++ is such an example.

/*Program to
Display a Window on Windows
Test Compiled using Visual C++
*/


#include <windows.h>

LRESULT CALLBACK WindowFunc(HWND, UINT, WPARAM, LPARAM);

char szWinName[] = "MyWin";

int WINAPI WinMain(HINSTANCE hInstance,
HINSTANCE hPrevInstance,
LPSTR lpszArgs,
int nWinMode)
{
HWND hwnd;
MSG msg;
WNDCLASSEX wcl;

wcl.cbSize = sizeof(WNDCLASSEX);
wcl.hInstance = hInstance;
wcl.lpszClassName = szWinName;
wcl.lpfnWndProc = WindowFunc;
wcl.style = 0;
wcl.hIcon = LoadIcon(NULL, IDI_APPLICATION);
wcl.hIconSm = NULL;
wcl.hCursor = LoadCursor(NULL, IDC_ARROW);

wcl.lpszMenuName = NULL;
wcl.cbClsExtra = 0;
wcl.cbWndExtra = 0;

wcl.hbrBackground = (HBRUSH) GetStockObject(WHITE_BRUSH);

if(!RegisterClassEx(&wcl)) return 0;

hwnd = CreateWindow(szWinName,"Windows XP",WS_OVERLAPPEDWINDOW,CW_USEDEFAULT,CW_USEDEFAULT,CW_USEDEFAULT,CW_USEDEFAULT,NULL,NULL,hInstance,NULL);


ShowWindow(hwnd,nWinMode);
UpdateWindow(hwnd);

while(GetMessage(&msg,NULL,0,0))
{
TranslateMessage(&msg);
DispatchMessage(&msg);
}
return msg.wParam;
}

LRESULT CALLBACK WindowFunc(HWND hwnd,
UINT message,
WPARAM wparam,
LPARAM lparam)
{
switch(message)
{
case WM_DESTROY:
PostQuitMessage(0);
break;
default:
return DefWindowProc(hwnd,message,wparam,lparam);
}
return 0;
}


Windows OS Skeleton
Windows is called so because all things you see on your desktop is broken into small Windows. A Window can have many child windows, parent window, and many other windows on the same level.

Getting Started to Windows Programming in C(++)?
A minimal Windows program must have atleast 2 functions
  • WinMain()
  • WindowFunc()


the WinMain() Function
The WinMain() function is the entry point to your program, i.e, the execution of your program starts with WinMain().
int WINAPI WinMain(HINSTANCE hInstance,HINSTANCE hPrevInstance,LPSTR lpszArgs,int WinMode)

The WinMain function must
  1. Define a window class

  2. Register the class (RegisterClassEx)

  3. Create Window (CreateWindowEx)

  4. Display Window (ShowWindow)

  5. Get the message loop running(while(GetMessage(...)))


The contents in italics is the functions used for doing the specified actions. Check them out in the code.

the Window Procedure
The window Procedure is the link between your program and windows. It is the window procedure that windows calls to send messages to your application.

That's all for now
stay tuned.

Tuesday, June 19, 2007

Yahoo! Built in chat with mail

Yahoo!
Catches up with Google and introduces the same Inbox + Messenger bundle. On the new yahoo mail beta now you can chat to your friends too.


At first look yea it rocks. It has almost all the formatting and smilies used by messenger. (Of course the Gizmos are missing).

But still gmail is ahead because, gmail allows you to be signed in on more than one place. For eg: mail and google talk. Yahoo does not allow that when you sign in inside the mail, you get disconnected on the messenger. I donno about you but hmmm I dint like that.

Secondly the gMail client is neatly presented on top of your mails, So you can go on reading the mails while your slow friend is finding the keys on keyboard ;)
Third, I hate that advertisement on the right edge! And most importantly it refreshes too often making it a pain! Of course I know free always implies filled with ads , but I guess this is a little too much.

What do you think?

Saturday, March 24, 2007

Why Laptop Performance lower on batteries

Why is my game running slower than expected when on batteries ?

The answer is, when your laptop is running on batteries, it tries to save power by reducing the clock speed. Thus the full speed of the CPU is not used and a lower clock speed is set. This is what that causes the game's poor performance.

How can i get the maxinmum performance on batteries ?

Performance can be gained by sacrificing power. So all you have to do is goto the
Control Panel » Power Options » Change the Power Scheme from Portable/Laptop to Home/Desktop. (Windows)

By doing this the laptop does not uses power saving schemes and your game will run at a better performance.

Got a Better answer?
Lemme know ...

Friday, March 16, 2007

The MP3 ID3 Tag

Intro: ID3V2?
ID3 tags are blocks of data in mp3 that stores information about the song. It can be used to store anything from album names, performing artists, movie/album, genre, to jpg pictures containing the CD covers. ID3V2 is the second version of the ID3 tag on mp3. The following is about the ID3V2 structure.

ID3 Tags can be found anywhere in the mp3 file and there is no typical standard for its location. So how do we find it ?

ID3 Tags start with the 3 letters ID3 (what else?). All data in the ID3 Tags are BigEndian

ID3 Tag General Structure (ID3V2.4)
ID3 Tags can be imagines as a book, which contains many pages (called frames). Like any book, ID3 tag has a preface/intro about the tags that follows as a 10 byte header.

Header (10 bytes)
Extended Header (Variable) (optional)
Frames (Variable)
Padding (Variable) (optional)
Footer (10 bytes) (optional)

ID3 Header
ID3 Header is 10 bytes long.

ID:
Byte1 : I 0x49
Byte2 : D 0x44
Byte3 : 3 0x33

Byte4 : Major Version , Typically 2
Byte5 : Minor Version , (Latest 4)

Byte6 : Flag Byte [ABCD 0000]

Size:
Byte7 : Length of the ID3 Frames.
Byte8 :
Byte9 :
Byte10: 4 x 8 = 32 Bit Unsigned Long Integer.

The Equivalent C structure for the ID3 Tag Header is given below :

struct id3v2header
{
char id[3];
unsigned char majVer;
unsigned char minVer;
unsigned char flags;
unsigned long size;
};


The 8 bits on the flag have the following meaning

MSB
Bit8 : If SET indicates use of unsynchronization
Bit7 : If SET indicates presence of Extended Header
Bit6 : Experimental Bit
Bit5 : If SET indicates presence of Footer.
Bit4-Bit1 : Must be 0.
LSB

ID3 Footer Optional
ID3 is footer is same to that of the header except that the first 3 bytes contain 3DI instead of ID3.

ID3 Frames
Frames are like the pages of the book where the actual data is present.
As usually a frame starts with the Frame Header that describes the frame contents, like what the data following it is about.
Frame Header is 10 bytes long.

Frame ID : (4 characters long)
Byte1 : 0xXX
Byte2 : 0xXX
Byte3 : 0xXX
Byte4 : 0xXX

Size: (32 bit SynchSafe Integer)
Byte5 : MSB
Byte6 :
Byte7 :
Byte8 : LSB

Flags:
Byte9 :
Byte10:

The Equivalent C structure for the Frame Header is given below :

struct id3v2frameheader
{
char frameid[4];
unsigned long size;
unsigned char flag1;
unsigned char flag2;
};


The Frame ID stands for a combination of characters A-Z , 0-9 to make an abbreviation for the contents :
Here are some of the common Frame ID's :

AENC Audio encryption
APIC Attached picture
ASPI Audio seek point index
COMM Comments
COMR Commercial frame
ENCR Encryption method registration
EQU2 Equalisation
ETCO Event timing codes
GEOB General encapsulated object
GRID Group identification registration
LINK Linked information
MCDI Music CD identifier
MLLT MPEG location lookup table
OWNE Ownership frame
PRIV Private frame
PCNT Play counter
POPM Popularimeter
POSS Position synchronisation frame
RBUF Recommended buffer size
RVA2 Relative volume adjustment (2)
RVRB Reverb
SEEK Seek frame
SIGN Signature frame
SYLT Synchronised lyric/text
SYTC Synchronised tempo codes
TALB Album/Movie/Show title
TBPM BPM (beats per minute)
TCOM Composer
TCON Content type
TCOP Copyright message
TDEN Encoding time
TDLY Playlist delay
TDOR Original release time
TDRC Recording time
TDRL Release time
TDTG Tagging time
TENC Encoded by
TEXT Lyricist/Text writer
TFLT File type
TIPL Involved people list
TIT1 Content group description
TIT2 Title/songname/content description
TIT3 Subtitle/Description refinement
TKEY Initial key
TLAN Language(s)
TLEN Length
TMCL Musician credits list
TMED Media type
TMOO Mood
TOAL Original album/movie/show title
TOFN Original filename
TOLY Original lyricist(s)/text writer(s)
TOPE Original artist(s)/performer(s)
TOWN File owner/licensee
TPE1 Lead performer(s)/Soloist(s)
TPE2 Band/orchestra/accompaniment
TPE3 Conductor/performer refinement
TPE4 Interpreted, remixed, or otherwise modified by
TPOS Part of a set
TPRO Produced notice
TPUB Publisher
TRCK Track number/Position in set
TRSN Internet radio station name
TRSO Internet radio station owner
TSOA Album sort order
TSOP Performer sort order
TSOT Title sort order
TSRC ISRC (international standard recording code)
TSSE Software/Hardware and settings used for encoding
TSST Set subtitle
TXXX User defined text information frame

UFID Unique file identifier
USER Terms of use
USLT Unsynchronised lyric/text transcription

WCOM Commercial information
WCOP Copyright/Legal information
WOAF Official audio file webpage
WOAR Official artist/performer webpage
WOAS Official audio source webpage
WORS Official Internet radio station homepage
WPAY Payment
WPUB Publishers official webpage
WXXX User defined URL link frame

Reference from id3v2.4.0-frames.txt from id3.org


Frame Flags
Flag1 : Frame Status Flags
MSB:
Bit8 : Not Used Must be 0
Bit7 : If SET the Frame is discarded when a change in the TAG occurs.
Bit6 : If SET the Frame is discarded when the file is changed.
Bit5 : If SET indicates the tag is read-only and changing the contents may break some code.
Bit4 : Not Used Must be 0
Bit3 : Not Used Must be 0
Bit2 : Not Used Must be 0
Bit1 : Not Used Must be 0
LSB

Flag2 : Frame Format Flags
MSB
Bit8 : Not Used Must be 0
Bit7 : If SET indicates the presence of grouping information.
Bit6 : Not Used Must be 0
Bit5 : Not Used Must be 0
Bit4 : If SET the frame is compressed using zlib deflate method.
Bit3 : If SET the frame is encrypted, with descriptions in ENCR Frame.
Bit2 : If SET Frame has been unsynchronized.
Bit1 : If SET a data length indiciator is present.
LSB

That's All Folks
For more information visit,
» http://www.id3.org

Wednesday, March 14, 2007

Windows Registry : Something you must know

Intro
Whats this all about ? Registry is the place where most windows programs store some data associated with that program. Moreover, registry is used by windows to store much of the configuration information, file associations, start up programs, etc ...

The registry is mainly divided into 5 sections

HKEY_CLASSES_ROOT
HKEY_CURRENT_USER : Current User Preferences.
HKEY_LOCAL_MACHINE (HKLM): Global Preferences.
HKEY_USERS
HKEY_CURRENT_CONFIG : Current System Configuration.

Using the Registry

The Regedit is similar to the explorer, the left side consists of a Tree View with the various folder locations, and the right side shows the contents of the particular folder. A folder contains sub folders, key-value pairs and a (default) value.
To edit the key values right click to see the menu or double click the key.
To open a folder just double click or use the left side tree to navigate to the folder.

Important Registry Locations

Start Up

HKEY_LOCAL_MACHINE\SOFTWARE\Microsoft\Windows\CurrentVersion\Run
: This location consists of all the programs that are executed by the computer after windows has loaded. Check this location periodically, most virus makes an entry here to startup when windows runs.

Shell Folders
HKEY_LOCAL_MACHINE\SOFTWARE\Microsoft\Windows\CurrentVersion\Explorer\Shell Folders
Stores all shell folder locations like My Documents, Music, Pictures etc,.

System Settings
HKEY_CURRENT_USER\Software\Microsoft\Windows\CurrentVersion\Policies\System 
: Certain critical applications such as the task manager and registry editor can be disabled by entries in this folder.
If DisableRegistryTools, DisableTaskMgr
has a value 1, then regedit.exe and taskmgr.exe (registry editor and task manager cannot be run !!) Some viruses make use of this to disable the end tasking of virus applications.

Thursday, March 8, 2007

Cancelling Automatic System Shutdown on XP

Introduction
Have you ever lost valuable data because of the automatic shutdown window that pops up now and then? Have you been frustrated by this window ?


The SYSTEM SHUTDOWN window
Appears mostly when XP considers itself unstable and needs to reboot, It gives us a window of barely 1 minute to pack up our things and save all the work etc. But what if you want more than a minute to do this. End Tasking or Closing the window does not work.

Here is how to do it ..


  • Run the command prompt ( Start > Run > Open: cmd )

  • In the command prompt, type :
    shutdown -a

  • Thats all


This procedure aborts the system shutdown and gives you enough time to save all your work. It is strongly recommended that you manually reboot the system after you are done with the saving.

Friday, March 2, 2007

Google Search for Pro's

Intro
Google is more than simply search engine, it is a multi faceted tool which can be used by professionals in all ventures. Here is the google language for searching :


  • [site:]This modifier is used to limit search results to a specified site. Eg:orkut hacks site:digitalpbk.blogspot.com

  • [allintitle:]This modifier when used will limit all your search queries to within the title. Eg: allintitle:the digital me

  • [intitle:]This modifier when used will limit first search query to within the title. Eg: the digital me intitle:digital arun
    This will return all sites with digital on the title and contain arun anywhere in the document.

  • [allinurl:]This modifier when used will limit all your search queries to within the URL . Eg: allinurl:making wmp skin

  • [inurl:]This modifier when used will limit the first search query to within the title. Eg: inurl:digitalpbk orkut
    Searches for digitalpbk in url and orkut in the document


  • [define:] This keyword attempts to find you a definition of the search query you have mentioned. Eg define:wifi

  • [info:] Info provides information about a given web page. Eg: info:digitalpbk.blogspot.com

  • [related:]. This keyword will produce search results related to the query specified.

  • [link:] This keyword links all pages that links to your specified site.

  • [cache:] This keyword lists pages that inside the google cache.

Thursday, January 11, 2007

Base 64 Encoding

Introduction
Base 64 encoding is a method used in email systems. The email systems that where developed back in the time of Arpanet, where designed to support only Letters (A-Z,a-z) , Numbers (0-9) and some limited puncutation marks. So inorder to transfer files which can contain more than characters and digits (for eg,a picture.jpg file), Base 64 Encoding is used.

The Encoding
Base 64 encoding, as the name suggests, has 64 different characters to represent all the 255 characters in the ASCII code. 64 different characters implies 6 bits as the word length. (no: of bits to represent a character)(2^6=64). So the encoding method is to group the binary data in groups of 6 bits.


1000101001001001111010110101010010010011
1000101001001001111010110101010010010011

Now the grouped 6 bits words are represented by letters, digits and punctuations. A table is defined to denote the mappings of the bit pattern to a corresponding character. Here is a sample of base64 encoding:

VGhpcyBpcyBhbiBleGFtcGxlIG9mIGJhc2U2NCBlbmNvZGluZy4=

which stands for This is an example of base64 encoding.
You can find out more about this on google


Google


Google Cookie
Base64 encoding is used in more than email systems, it is used in URL encoding of binary data. Those using google mail will have seen a stream of letters on their address bar. This base64 encoding of data. Google cookie or in short Gookie also use Base64 encoding to store data. The SID is a base64 encoding.

Similarly Orkut cookie structure is as follows:

ORKUTPREF=ID=[Profile ID]:
INF=0:SET=:LNG=1:CNT=91:RM=0:USR=[Base64 of your email]:
PHS=:TS=

Have more information on this? Leave a comment...

PHP Code/Functions
PHP base64 functions are :
  $ret = base64_encode($str);
  $ret = base64_decode($str);

Friday, December 1, 2006

How to make Windows Media Player Skins

What is a WMP skin?
WMP or Windows Media Player Skin is a way of customizing how the media player looks. Basically a wmp skin is a .wmz file found on "X:\Program Files\Windows Media Player\Skins\" folder (Replace X with your drive letter). Here we shall atempt to create a simple skin, from which you can create more advanced skins.


WMZ File Format
WMP Skins consists of a collection of files zipped together. So it means, the WMZ file on your computer is actually a .ZIP file. Inorder to decompress the file and view the content files, rename the .WMZ file to .ZIP and use a unzipping utility such as WinZIP or WinRAR to extract the containing files.
Take for example the Classic.wmz file, renaming and extracting gives us the following files:


classic.wms classic.js back_disabled.bmp back_down.bmp
back_hover.bmp back_up.bmp currentpos_background.bmp currentpos_thumb.bmp
divider.bmp ffw_disabled.bmp ffw_down.bmp ffw_hover.bmp
ffw_up.bmp forward_disabled.bmp forward_down.bmp forward_hover.bmp
forward_up.bmp icon_stereo.bmp icon_wmlogo.bmp intro_disabled.bmp
mute_down.bmp mute_hover.bmp mute_up.bmp next_disabled.bmp
next_down.bmp next_hover.bmp next_up.bmp pause_disabled.bmp
pause_down.bmp pause_hover.bmp pause_up.bmp play_disabled.bmp
play_down.bmp play_hover.bmp play_up.bmp prev_disabled.bmp
prev_down.bmp prev_hover.bmp prev_up.bmp rw_disabled.bmp
rw_down.bmp rw_hover.bmp rw_up.bmp stop_disabled.bmp
stop_down.bmp stop_hover.bmp stop_up.bmp toggle_down.bmp
toggle_hover.bmp toggle_up.bmp volume_background.bmp volume_thumb.bmp

The main file in this collection is the "Classic.wms" file. It is just an XML file and can be edited or created with any text editing software.


Can't see the WMZ extension?

Goto folder options and uncheck "Hide Extensions of known Type"

Click here to Download the sample skin file made in the following section.


Starting with your own skin ...

  • Make a folder in the ":\Program Files\Windows Media Player\Skins\", with a suitable name, as in my case "digitalpbk".
  • Next inside the folder make a new file, with the name and extension ".wms" , (digitalpbk.wms).
  • Paste the following code with suitable substitutions
    Show/Hide Code

    <theme
    title="DigitalPbk"
    author="Arun P"
    copyright="(c)2006 http://digitalpbk.blogspot.com . All rights reserved."
    version="1.0"
    >
    <view>
    </view>
    </theme>

  • Save the file.


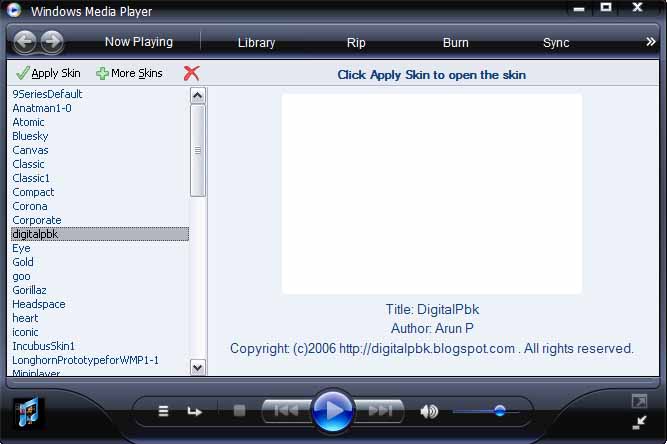
    Now we have made a base for our skin. Check out if you have done it right, by taking the WMP Skin chooser. Look for the skin with the name you have given (digitalpbk), and click it. Depending on the version of WMP you are using you will see a white rectangle. The Picture here shows the skin on Windows Media Player 11.


  • Next we can start making the actual theme. Modify the view node to accomodate the following :
    Show/Hide Code

    <view id="mview"
    left="0" top="0" width="600" height="267"
    resizable="false"
    minWidth="600" minHeight="267"
    titlebar="false"
    title="Digitalpbk"
    scriptFile="digitalpbk.js"
    onload="init()"
    backgroundColor="none"
    >

    Make a new js file under the folder (Skins\digitalpbk\). For eg: digitalpbk.js. This will be our primary script file. As you can see it is very much similar to a HTML,

    id represents the name or identifier of the tag (node)

    left, top, width, and height give the dimensions

    minWidth and minHeight restricts the minimum possible size of the Skin (not used on resizable="false") just given for illustrative purpose.

    resizable="false" specifies that our skin cannot be resized,giving false makes it remains in the specified dimensions.

    titleBar="false" hides the title bar (The one on top with the Close, Maximize, And Minimize buttons).

    scriptFile represents our javascript file which handles the programming part of the skin.

    onload and onresize are events which are triggered when the window is loaded or resized respectively. Please note that the onresize event is not called in case the skin is not resizable.

    backgroundColor="none" specifies that the skin is transparent in areas where nothing is there. Alternatively you can specify a color to fill those areas, but transparency is cooler.

    At this point if you apply the skin you wont be able to see anything! In case you applied the skin and want to return to the full mode, press Ctrl + 1 to return to full mode.


  • Regions in the Main View are divided into various Sub Views. Now we are into the actual making of the user interface, the buttons, the sliders etc.
    First we place a base for the control view, with a suitable background. The following code comes under the View node. (<view></view>)

    <subview backgroundImage="main_bg.png" transparencyColor="#ff00ff" >
    </subview>

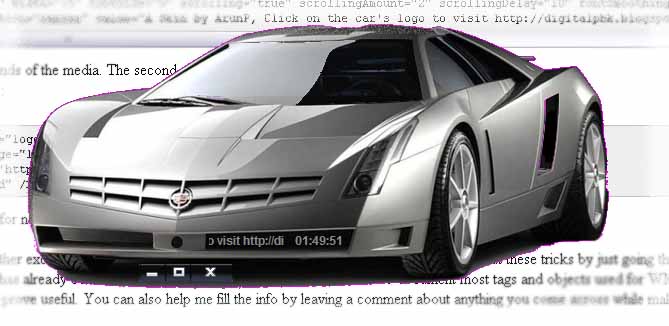
    You can generally use any background image of formats bmp,png,gif etc. I have used a png file with a car as base. When making the picture portions you want to be left transparent must be filled with a particular colour (#FF00FF commonly used). This colour is specified in the transparencyColor attribure.
    Now the product looks somewhat like this:


  • Next we place buttons for minimizing, closing and return to full mode. Let us place them somewhere in the bottom center. (Inside the subview node)
    Show/Hide Code

    <buttongroup id="mainfx" left="120" top="240"
    image="mfx_norm.gif" hoverImage="mfx_over.gif"
    downImage="mfx_over.gif" mappingImage="mfx_map.gif"
    transparencyColor="#ff00ff" >
    <buttonelement mappingColor="#0000ff" onClick="view.minimize()" upToolTip="Minmize" cursor="hand"/>
    <buttonelement mappingColor="#0080ff" onClick="view.returnToMediaCenter()" upToolTip="Return To Full Mode" cursor="hand"/>
    <buttonelement mappingColor="#00ffff" onClick="view.close()" upToolTip="Close" cursor="hand"/>
    </buttongroup>

    This code places three buttons with hover effects.

    image attribute specifies the normal image file

    hoverImage specified the hover image file

    mappingImage provides the map of the buttons so that the program knows to differentiate the three buttons.


    Normal Image :
    Hover Image :
    Mapping Image :

    The mapping color specified in the buttonelement tag is the colour given on the mapping image. Thus three buttons with hover effects are ready.
    The onclickevents does the functions specified and can be easily understood. cursor="hand" specifies the cursor type when over the buttons.

  • Similarly we will place buttons Play, Pause, Stop, Next Previous etc.
    Show/Hide Code

    <buttongroup id="pps" left="128" top="15" image="pps_norm.png"
    hoverImage="pps_over.png" downImage="pps_over.png" mappingImage="pps_map.png"
    transparencyColor="#ff00ff" >
    <buttonelement mappingColor="#8080FF" onClick="player.controls.stop()"
    upToolTip="Stop" cursor="hand"/>
    <buttonelement mappingColor="#8000FF" onClick="player.controls.pause()"
    upToolTip="Pause" cursor="hand"/>
    <buttonelement mappingColor="#0000FF" onClick="player.controls.play()"
    upToolTip="Play" cursor="hand"/>
    </buttongroup>
    Normal Image :
    Hover Image :
    Mapping Image :
  • Next we add a volume slider bar.
    Show/Hide Code

    <customSlider id="volume" left="520" top="70"
    min="0" max="100" borderSize="0" image="vol.png"
    positionImage="vol_pos.png" enabled="true"
    value="wmpprop:player.settings.volume"
    value_onchange="wmpprop:player.settings.volume = value;updateVolToolTip('volume');player.settings.mute = false;"
    cursor="hand"
    toolTip="Volume" onMouseUp="toolTip='Volume'" transparencyColor="#ff00ff" />
    NormalImage is a series of images for each position of the volume.

    positionImage is map of grayscale gradient representing a series of buttons indicating volume levels.

    Value indicates the volume value and initialized to the volume. When changed, the volume is updated. updateVolToolTip is a javascript function which updates the volume tooltip and its code is pasted in the "digitalpbk.js" which is as follows:

    function updateVolToolTip(id){
    vol = "";
    vol += player.settings.volume;
    eval(id + ".toolTip = vol" );
    }

    Normal Image :
    Position Image :

  • Next let us learn how to add dynamic and scrolling text.

  • Show/Hide Code

    <text id="time" left="250" top="210" width="100" fontSize="9" scrolling="false" fontSmoothing="true" foregroundColor="#888888"
    fontStyle="bold" justification="center" value="wmpprop:player.controls.currentPositionString" fontFace="arial narrow,arial,tahoma,verdana" />
    <text id="abt" left="190" top="210" width="75" fontSize="9" scrolling="true" scrollingAmount="2" scrollingDelay="10" fontSmoothing="true" foregroundColor="#888888"
    fontStyle="bold" justification="center" value="A Skin by ArunP, Click on the car's logo to visit http://digitalpbk.blogspot.com to find out how you too can make cool skins like this, easily." fontFace="arial narrow,arial,tahoma,verdana" />

    The first one displays the position in seconds of the media.
    The second one displays a scrolling text.
    Similarly you can add dynamic text that displays the Media Name, Bitrate, Volume, and other effects, and add your own custom text.
  • Finally adding a link in the skin to our site:

  • Show/Hide Code

    <button left="145" top="161" image="logo.png"
    hoverImage="logo_over.png" downImage="logo.png"
    onClick="jscript:player.launchURL('http://digitalpbk.blogspot.com/')"
    upToolTip="Visit blog" cursor="hand" />

  • Similarly you can add a custom slide bar for navigation, add buttons to provide for next and previous etc.


  • More tags and javascript functions and other exciting effects like playing sound can be achieved using skins. You can find out these tricks by just going through the source of various skin files. (The way to rip the .WMZ file has already been discussed above).


  • Finally inorder to package your skin, ZIP all the files using WinZIP/WinRAR or any other compressing utility. Note that you should zip all the files and NOT the folder. Rename the ZIP to WMZ, and your all set.


Click here to Download the skin file we just made (if you already haven't done so).


Winding up

Hope this section was interesting and helpful, any comments, suggestions or info? Please feel free to comment...

Monday, November 13, 2006

Why cant a folder be named "CON" or "LPT1" in windows?


File/Folder named CON or LPT1 on WINDOWS


G:\>mkdir CON
The directory name is invalid.

G:\>mkdir LPT1
The directory name is invalid.

G:\>mkdir LPT2
The directory name is invalid.

G:\>mkdir LPT9
The directory name is invalid.

Have you ever tried to make a folder or file named CON or LPT1 (in general LPTX X takes 1,2,3,...9)? If not try now and see that you cannot make a folder or file with those names. Have u already done? Read on ...

Why is this so?

Inorder to find out why this doesn't work we have to go back to the age of MS-DOS. Microsoft Disk Operating System (MS-DOS) is a command-line operating system that existed before the advent of GUI OS (Graphical User Interface). Everything from making ,renaming, deleting etc was done using commands. Some of the commands are

COPY Copies one or more files to another location.
DEL Deletes one or more files.
DIR Displays a list of files and subdirectories in a directory.
FIND Searches for a text string in a file or files.
.
.

Let us look more closely to the COPY command. The COPY command usage is as follows:
COPY [options] <source> [options] <destination>
In DOS everything is considered as files, even keyboard and printers. The filename for keyboard is given as "CON" and the printer names are given as "LPT1", "LPT2" etc.. So inorder to copy something from keyboard (our input) the following command is used.

G:\>COPY CON mydata.txt
These lines come in mydata.txt and inorder to stop input press Ctrl+Z
^Z

G:\>COPY mydata.txt LPT1


So now you suppose that a folder or file named "con" could be created and you give a COPY CON command. What is DOS supposed to do? copy the CON file or use the keyboard console as input? Thus an ambiguity arises. So Microsoft has purposely disabled making of files or folders named CON / LPT1 / LPT2 etc. in order to remove this ambiguity.

Could you make a CON or LPT1 .. file on WINDOWS?


Found more invalid names? Let me know .....
Invalid Name List

+ CON
+ LPT1, LPT2, LPT3, LPT4 ... LPT9
+ PRN
+ NUL
+ COM1, COM2, COM3 .... COM9